

Submissions belong to the Shopify store that owns the key. Merchants manage them in Shopify admin → Customerssay.ai Reviews App → Manage Reviews. Reviews that require moderation become public after approval, according to the store’s review settings.
Before you start
- Install the production Customerssay.ai Reviews App on the Shopify store.
- Prepare your storefront domain and a real product ID from that store.
- Decide whether requests will come from the browser, your server, or both.
Create API keys
Open Shopify admin → Apps → Customerssay.ai Reviews App → Headless.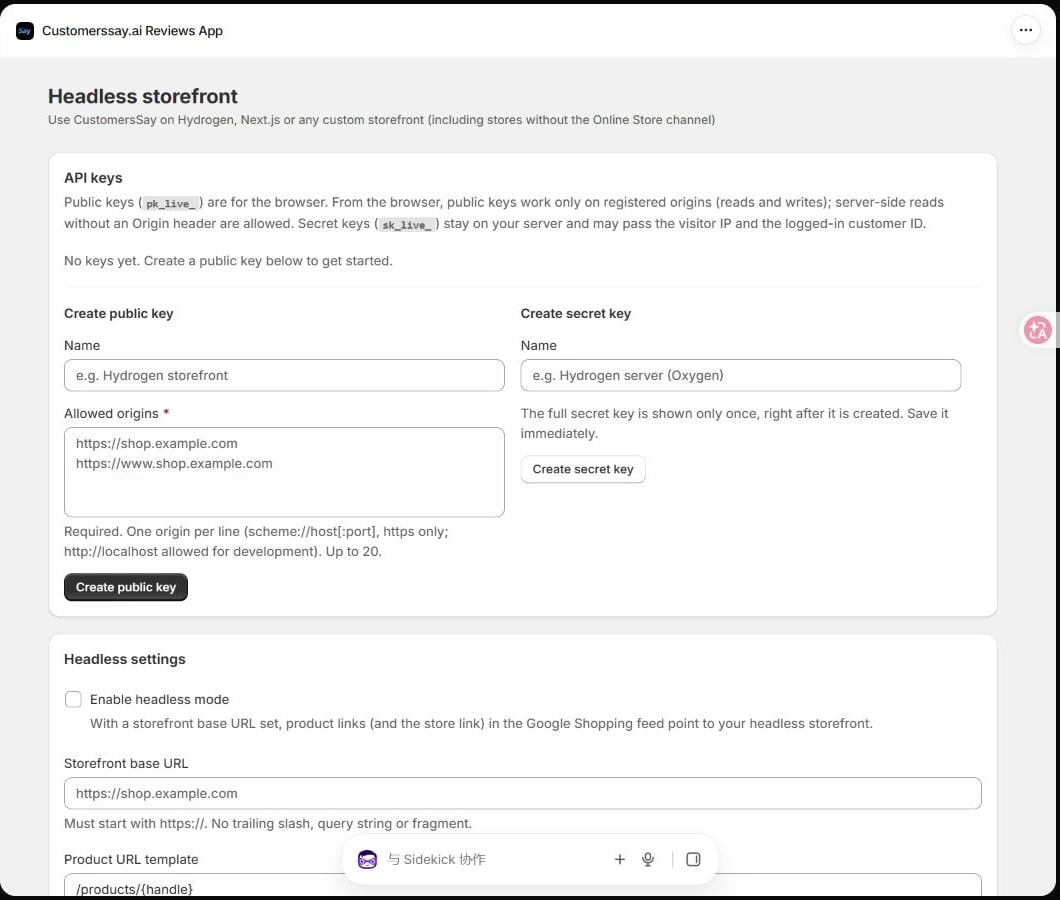
The public and secret key creation sections in the Headless page
Create a public browser key
- Under Create public key, enter a recognizable Name, such as
Production storefront. - Add your real storefront origins to Allowed origins, one per line. For example,
https://shop.example.comandhttps://www.shop.example.com. - Click Create public key and copy the complete key starting with
pk_live_. You can copy an existing public key from the key list later. - Use this key in your browser integration. Register development and production origins separately.
https://shop.example.com and https://www.shop.example.com are different origins, as are http://localhost:3000 and http://localhost:5173. Use HTTPS in production. Local HTTP origins such as http://localhost:3000 are supported. Each public key allows up to 20 origins.
Create a secret server key
- Under Create secret key, enter a name such as
Storefront server. - Click Create secret key and immediately save the complete key starting with
sk_live_. Its full value is shown only once. - Store it in your server environment or deployment platform’s secret settings, then redeploy the server.
Configure your storefront links
In Headless settings, enable Enable headless mode when Google Shopping feed product links should point to your custom storefront. Enter a Storefront base URL, such ashttps://shop.example.com, and a Product URL template, such as /products/{handle}, then click Save settings.
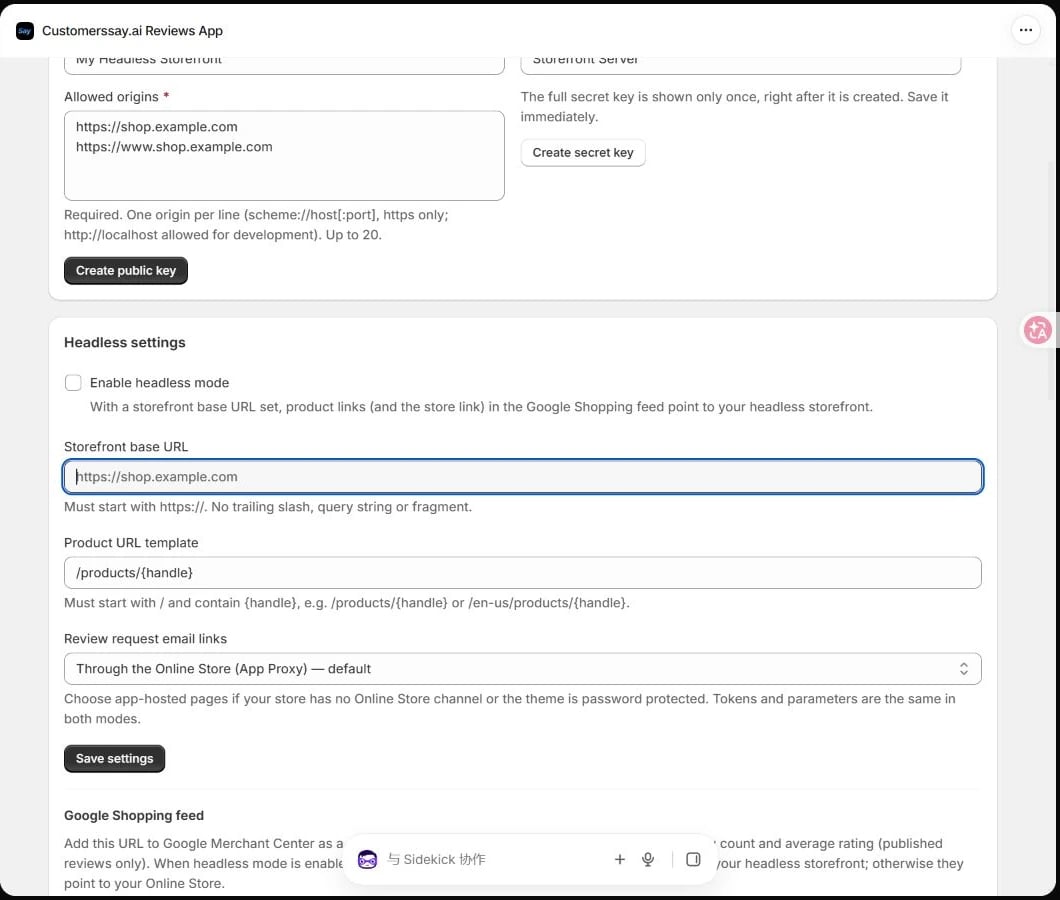
Storefront URL, product path, and review request email link settings
/ and include {handle}; /en-us/products/{handle} is another valid example.
If your store has no Online Store channel, or its theme storefront is password protected, select App-hosted pages for Review request email links, then save. Review request and unsubscribe links will use app-hosted pages. Theme stores can keep the default App Proxy mode.
The headless mode setting controls link destinations. API requests are authenticated with their keys.
Choose an integration
The production API base URL is:
Add the embedded JavaScript widget
Place this on the product page. Replace the public key, Shopify store domain, and product ID with values from your store. Numeric product IDs and Shopify Product GIDs are supported. Set the configuration before loadingembed.js.
- Deploy the page to a registered origin. Opening a local
file://HTML file is not a valid storefront origin. - Open a real product page and check the reviews, rating, and write-review entry point. Products without published reviews show an empty state.
- Submit a clearly marked test review and check Manage Reviews. Publish it if the store requires approval.
window.CustomersSay.unmount(element) before mounting the new product with window.CustomersSay.mount(element, { productId }).
For a site with a Content Security Policy, allow the app domain for scripts, styles, and API connections, and allow the media storage domain for images and videos. Add your framework’s actual nonce to the configuration script when required. The widget needs style attribute permission, such as style-src-attr 'unsafe-inline'. Swiper assets are served by the app domain.
Use the API with your own styles
Run browser requests from a registered origin. Put the following read and submit examples in the same frontend ES module or<script type="module"> so top-level await and shared configuration work. Add <ul id="review-list"></ul> to your page first.
#review-list and its list items with your own CSS. In React or Vue, keep the response in state and render review content as text. Do not insert untrusted review content as raw HTML.
Use summary.total_reviews and summary.average_rating for your rating summary, and pagination.hasNextPage and pagination.totalPages for pagination. Product review star filtering uses rating_filter, not rating.
Submit a review
Product review submission uses FormData, not JSON. Let the browser setContent-Type and its multipart boundary. Required fields follow the store’s form settings; ratings must be integers from 1 to 5.
Idempotency-Key contract. Do not silently repeat a timed-out review submission; ask the customer to check the result or retry explicitly.
Upload images and video
- Send a FormData request to
POST /media-upload?productId=YOUR_PRODUCT_ID, withfile,type(imageorvideo), and theX-CustomersSay-Keyheader. - Read
file.url,file.type,file.thumbnailUrl, andfile.tempIdfrom the response. Reuse the returnedtempIdfor other files in the same review. - Add the upload results to
mediaUrls[],mediaTypes[], andmediaThumbnails[]when submitting the review. Keep the arrays in matching order; use an empty string when an image has no thumbnail URL.
413 response. The embedded widget handles the selection and upload flow for you.
Render reviews on your server
Call the API from a Hydrogen server loader, a Next.js server route, or another backend. Read the secret key from server-only configuration. Do not return it in loader data or component props, or expose it throughPUBLIC_ or NEXT_PUBLIC_ variables.
The following helper can live in a .server.js module:
/json-ld and merge it with your product page’s existing Product JSON-LD to avoid conflicting duplicate Product nodes.
For server-side submission, send FormData to /reviews using Authorization: Bearer <secret key>. Do not forward the browser’s Origin header with a secret-key request. Validate your own relay route, fix the upstream API destination, and apply CSRF protection and rate limits.
Derive the real visitor IP from your platform or trusted proxy. Forward it in X-CustomersSay-Client-IP and forward the visitor’s User-Agent in X-CustomersSay-Client-UA so visitor rate limits and reaction state are consistent.
For automatic verified purchase checks, first authenticate the logged-in customer on your server, then send X-CustomersSay-Customer-Id. Do not trust a customer ID supplied directly by browser form data. Public-key submissions are not automatically verified.
The optional @customerssay/react package provides components and server helpers. It is not published to public npm. Obtain the source or installation package from CustomersSay support before following the React and server integration guide.
API reference and troubleshooting
Base limits apply per key and visitor IP: 120 reads/minute and 20 writes/minute, with additional endpoint-specific limits. Without a trusted forwarded visitor IP, secret-key SSR requests share your server’s outbound IP quota.
Show a recoverable error for timeouts,
5xx, or 429. Do not turn a failed read into an apparent zero-review result. Error responses can contain either a string error or an object with code and message.
Rotate keys and verify the release
- Create the replacement key and register the production origin.
- Update your frontend or server configuration, redeploy, and verify reads and submissions.
- Use Edit origins to change an existing public key’s allowlist. Use Revoke and confirm to disable an old key. Create a replacement if a secret key is lost.
sk_live_ key appears in page source or browser requests, and provide clear handling for origin failures, rate limits, and service outages.
See the complete Storefront API contract for the remaining endpoints and request details.
Updated November 11, 2026. Screenshots use a demonstration store. Replace all example domains, keys, and product IDs with your own values.